
What is Cloudflare and why use it?
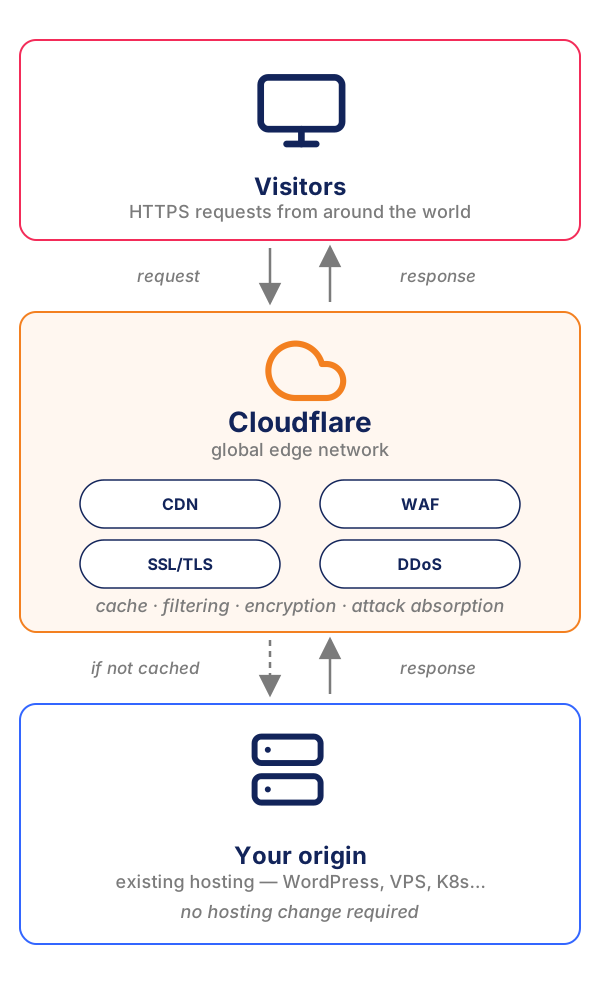
Cloudflare is a global edge network. It sits between visitors and your origin server, and plays several roles at once: CDN (Content Delivery Network, a distributed cache that serves assets from the nearest data centre), Web Application Firewall (WAF, a filter that blocks malicious requests), DNS provider, DDoS protection layer, and TLS termination point. One dashboard for the lot.
For a beginner, three benefits matter most:
- Speed. Static files are served from data centres close to your visitors, not from your origin. Pages load faster, especially on mobile and on long-haul connections.
- Security. Cloudflare absorbs most automated attacks (DDoS, credential stuffing, vulnerability scanners) before they reach your server. SSL/TLS encryption can be turned on in minutes.
- Resilience. If your origin slows down or briefly goes offline, Cloudflare can still serve cached pages and keep the site up.
A Cloudflare setup does not require you to change hosting. Your existing hosting stays in place, Cloudflare sits in front of it.
Sitting in front of it is not the same as taking it off the Internet: the origin keeps a public IP that answers. Closing that is a separate exercise, and it goes in three levels of origin lockdown.
Step-by-step guide to setting up Cloudflare
1. Create a Cloudflare account
To get started, go to cloudflare.com and click Sign Up. Use a work email address, not a personal one, so colleagues can be added later. Confirm the email, set a strong password, and enable two-factor authentication (2FA, a second login factor such as an authenticator app) before you do anything else.
Avoid using shared or group email addresses like tech@yourcompany.com for Cloudflare accounts. Use a personal work email so you can set up two-factor authentication and maintain secure, accountable access.
2. Add your website (add Cloudflare to website)
From the dashboard, click Add a Site and type your domain (for example, example.com, no www, no https://). This is the moment you add Cloudflare to your website at the DNS level. Cloudflare scans your existing DNS records and lists what it finds.
This first scan is automatic but not exhaustive. Always cross-check it against your current DNS zone file before continuing.
3. Choose a plan
Cloudflare offers Free, Pro, Business, and Enterprise plans. For most beginners and personal projects, Free is enough: CDN, basic WAF, unmetered DDoS protection, universal SSL. Pro adds image optimisation, additional WAF rules, and faster support. Business and Enterprise add advanced bot management, prioritised support, and custom WAF rulesets.
If you run a transactional site (e-commerce, banking, healthcare, government), do not stop at Free. The default WAF rules are not enough for regulated environments.
For an example of what compliance-grade configuration looks like in higher education, see how a Saudi public research university deployed Cloudflare Zero Trust.
4. Review and confirm DNS records (add Cloudflare DNS)
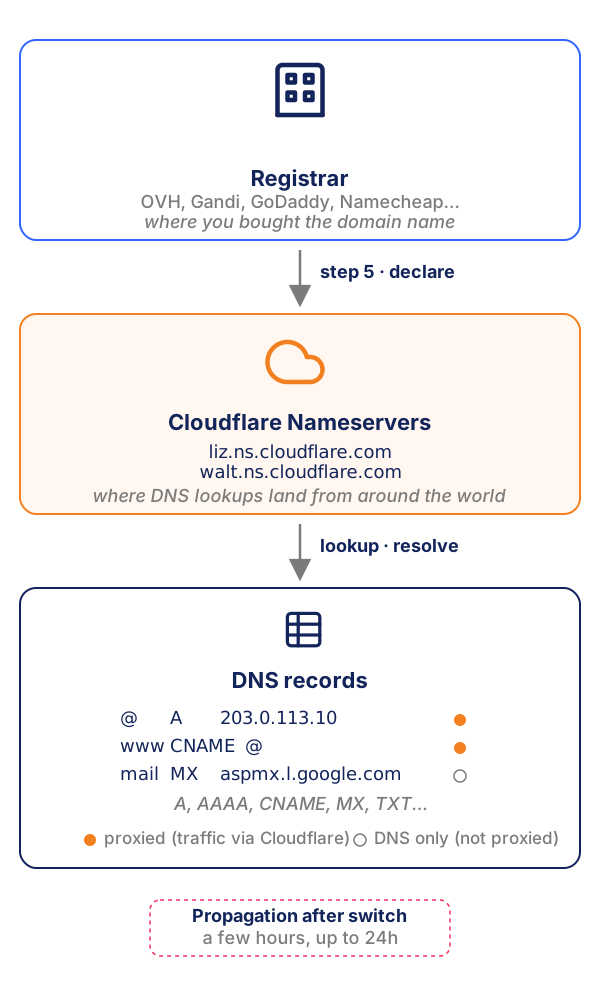
This is the step where most beginners trip when setting up Cloudflare. Cloudflare displays the records it imported and asks you to confirm. When you add Cloudflare DNS in front of your existing zone, every record must be accounted for. Check:
- Every A record (IPv4 address) and AAAA record (IPv6 address) is correct.
- Every CNAME record (alias to another domain) points to the right target.
- MX records (mail servers) are present. Without them, email stops working as soon as nameservers switch.
- TXT records for SPF, DKIM, DMARC, domain verification (Google Workspace, Microsoft 365, payment processors).
- The proxy status toggle (orange cloud or grey cloud) is set correctly. Orange means traffic flows through Cloudflare. Grey means DNS only, traffic bypasses Cloudflare. Use orange for web traffic (root,
www, app subdomains). Use grey formail,ftp,cpanel, and anything that must not be proxied. The official reference on proxied DNS records lists which record types are eligible.
Most post-setup outages come from a missing or wrong DNS record. The minutes you spend reviewing this list pay back.
Want a second pair of eyes before flipping the DNS? Two options at Brixio: Metryx, our free self-serve audit tool, or an engineer-led Cloudflare assessment when you need to go further.
5. Update your nameservers
Cloudflare gives you two nameservers (for example, liz.ns.cloudflare.com and walt.ns.cloudflare.com). Log in to your domain registrar (GoDaddy, OVH, Gandi, Namecheap, Google Domains, Squarespace Domains) and replace the existing nameservers with the two Cloudflare provides.
Propagation may take a few hours to 24 hours.
6. Enable SSL/TLS encryption
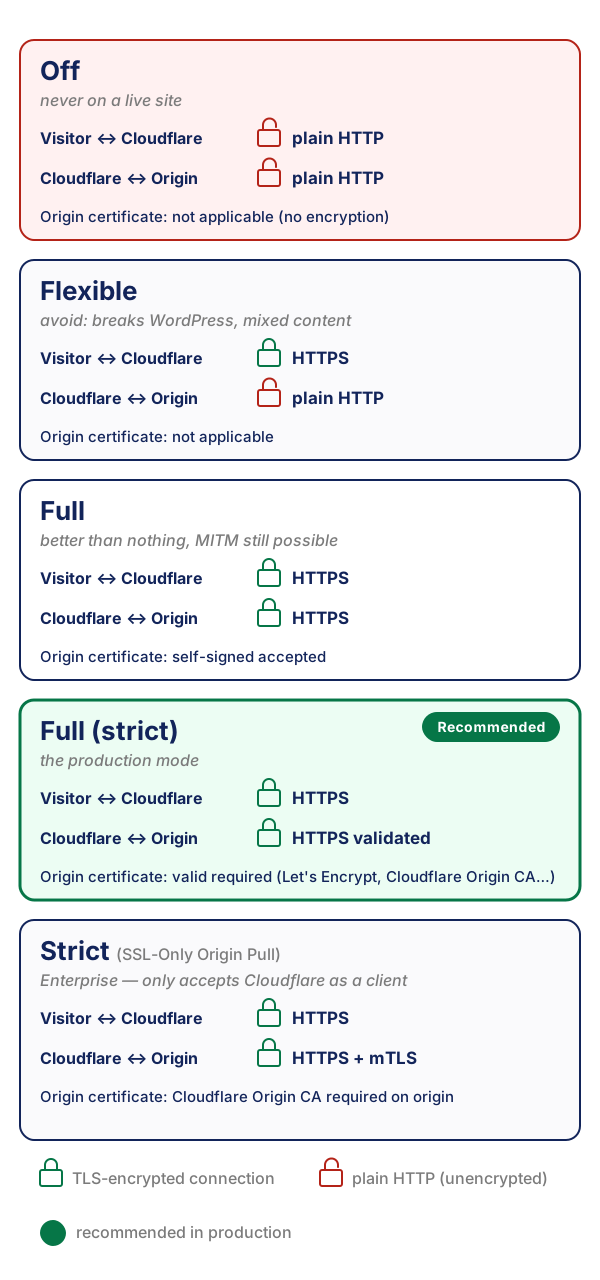
In the dashboard, go to SSL/TLS > Overview and pick an encryption mode. Cloudflare's SSL/TLS encryption modes documentation details each one. In short:
- Off. Never use this on a live site.
- Flexible. Cloudflare to visitor is encrypted, Cloudflare to origin is not. Avoid: it breaks WordPress login and triggers mixed content warnings.
- Full. Both legs encrypted, origin certificate can be self-signed.
- Full (strict). Both legs encrypted, origin certificate must be valid. This is the recommended mode for production sites.
Then in Edge Certificates, enable:
- Always Use HTTPS (forces all HTTP requests to redirect to HTTPS).
- Automatic HTTPS Rewrites (rewrites HTTP asset URLs in HTML to HTTPS).
- HTTP Strict Transport Security (HSTS, an HTTP header that tells browsers to always use HTTPS for your domain). Enable only when you are confident your site is fully HTTPS, including all subdomains.
7. Optimise your settings
Default Cloudflare settings work. They are not the most you can get out of the platform. Once DNS is live, spend time on the configuration. The next section is the list of options most beginners leave on the table.
Cloudflare settings beginners usually miss (best Cloudflare settings checklist)
Search for the best Cloudflare settings and you get dozens of opinions. The dashboard tucks several useful options behind tabs nobody opens. Turning them on is what takes a setup from working to actually noticeable.
On accounts we operate as Brixio Managed Services for Cloudflare, we revisit this checklist every quarter as Cloudflare ships new options.
Browser Integrity Check
Where: Security > Settings.
What it does: filters requests that look like they come from abusive user agents or known-bad signatures.
When to enable: always, for any public website.
Bot Fight Mode
Where: Security > Bots.
What it does: challenges suspected bots with a CAPTCHA or JavaScript challenge. Free version, replaces Super Bot Fight Mode for paid plans. Details in the Cloudflare Bot Fight Mode documentation.
When to enable: on any content site where automated scraping is unwanted. Disable temporarily if your own monitoring tools get blocked.
Always Use HTTPS and HSTS
Covered in step 6. Re-mentioning here because both are often left off when a setup is rushed.
Tiered Cache
Where: Caching > Tiered Cache.
What it does: caches your content across an internal hierarchy before reaching your origin, reducing origin load.
When to enable: if you serve more than a few thousand requests a day, the win is measurable.
Auto Minify (or its successor)
Where: Speed > Optimization.
What it does: removes whitespace and comments from CSS, JavaScript, and HTML at the edge.
When to enable: with caution. If your site already minifies at build time, double minification can break inline JavaScript. Test on a staging environment first.
Brotli compression
Where: Speed > Optimization.
What it does: compresses responses with the Brotli algorithm, which is more efficient than gzip.
When to enable: always.
The Cloudflare dashboard is dense. That density is exactly what makes it powerful for security and performance, but it also makes the early days harder than they need to be. If you already use an AI assistant like Claude, two things help. First, Cloudflare publishes an MCP (Model Context Protocol) server for its documentation, so the assistant can quote the official docs while you configure. Second, Cloudflare and Anthropic just announced Claude Managed Agents on Cloudflare, an execution environment that lets Claude run on Cloudflare infrastructure (Workers, V8 isolates, sandbox, browser, email). Handy for automating Cloudflare tasks once you are past the basics.
None of this replaces expertise. AI speeds you up, it does not stand in for knowing what you are doing. Cybersecurity decisions are not something you hand over to an AI. To Brixio, on the other hand, sure ;)
Can you host a website on Cloudflare?
Short answer: it depends what “host” means to you. Cloudflare offers three paths, each fitting a different starting point.
1. Cloudflare as a DNS proxy in front of your existing host. This is what the previous seven steps describe. Your site stays on its current hosting (WordPress on a shared host, Shopify, a VPS, a managed Kubernetes cluster), and Cloudflare protects and accelerates it at the edge. The hosting provider does the heavy lifting.
2. Cloudflare Pages for static or JAMstack sites. If your site is built with Next.js, Astro, SvelteKit, Hugo, or any static site generator, Cloudflare Pages can host it directly. Build pipeline, preview deployments, custom domains, all native. No separate hosting required.
3. A Cloudflare-native CMS such as Emdash. For teams that want the editorial flexibility of WordPress without its security and performance debt, the Emdash + Astro + Cloudflare stack is a modern alternative: Emdash for the CMS layer, Astro for rendering, Cloudflare Workers for compute and D1 for storage. Brixio runs its own marketing site on this stack. We document the migration story, what we kept from WordPress and what we left behind, in 400 websites later, why I am moving Brixio from WordPress to the Cloudflare edge.
For most readers of this guide, path 1 is the right place to start. Paths 2 and 3 become relevant when the site itself is being rebuilt.
Your website is now running on Cloudflare
If you have followed the seven steps and tuned the settings above, your Cloudflare configuration is in place. Your site sits behind a global edge network, encrypted, cached, and shielded from most automated threats. The Cloudflare dashboard shows you traffic, threat events, cache hit ratios, and bot activity within hours.
A few healthy first-week habits:
- Check Analytics > Traffic every day for a week. Sudden drops usually mean a DNS or cache misconfiguration.
- Look at Security > Events to see what Cloudflare is blocking. False positives are rare but they happen, especially on admin paths.
- Add the rest of the team to the account with the right roles, not as Super Admin.
Want to check your configuration? Run a free Metryx audit
Setup done. The next reasonable step: check that your Cloudflare configuration actually matches your security and performance goals. Metryx is Brixio's free Cloudflare audit tool. It runs a read-only scan of your environment and produces a report (viewable in the Metryx interface, downloadable as PDF) covering WAF, SSL/TLS settings, DNS, cache configuration, and bot exposure.
You stay in control:
- Read-only. Metryx never modifies anything on your account.
- A read-only Cloudflare API token. You paste it when launching the audit. No password, no admin access, no write permission. Revoke it in one click once the report is in.
- Free. Report available in the Metryx interface, downloadable as PDF.
Same starting checklist our engineers run on day one of a customer engagement, open to anyone who has just finished a Cloudflare setup.
FAQ
Cloudflare sits between visitors and your origin server. It accelerates content delivery from data centres close to each visitor, blocks malicious traffic at the edge before it reaches you, encrypts traffic with SSL/TLS, and absorbs DDoS attacks. You do not need to change hosting to use it.
Yes. The Free plan includes CDN, unmetered DDoS protection, universal SSL, basic WAF rules, and the Bot Fight Mode. It is enough for most personal sites and blogs. Pro, Business, and Enterprise plans add advanced features for production and regulated environments.
Yes, provided you carefully validate your DNS records before switching nameservers. Most outages during Cloudflare onboarding come from a missing MX record (email breaks) or a forgotten TXT record (third-party services break). Keeping the previous DNS zone active at the old provider for a short window after switching is a reasonable safeguard.
Always Use HTTPS, Full (strict) SSL/TLS mode, Browser Integrity Check, Bot Fight Mode, Brotli compression, and Tiered Cache if your traffic is significant. Enable HSTS only once you are confident all subdomains are fully HTTPS.
No. Cloudflare works as a layer in front of your existing hosting. Only if you want to host directly on Cloudflare (Pages or Workers-based CMS such as Emdash) does the hosting question come up.
When to call Brixio
A Cloudflare setup with the Free plan, careful DNS, and the optimisations above is enough for most personal and small business sites. But several situations call for an experienced partner:
- You run a production site with significant traffic and cannot afford a misstep during the nameserver switch.
- You operate in a regulated environment (banking, healthcare, government, fintech) with DORA, NIS2, PCI-DSS, or HIPAA requirements. The default WAF rules are not enough.
- You already have a Cloudflare account that is underused. Licensed features sitting idle are common, and an assessment can identify which ones to activate first.
- You are migrating from Akamai or another CDN on a tight timeline, with strict cutover windows.
- You are under attack and need Cloudflare deployed in under 60 minutes.
Brixio is an Authorised Cloudflare Service Delivery Partner (ASDP). We operate Cloudflare environments end to end: assessment, deployment, day-to-day operations, and emergency response.